Hyundai Venue (QX): Seat Belt Restraint System / Seat Belt-DriverŌĆÖs 3-point system with emergency locking retractor
To fasten your seat belt:
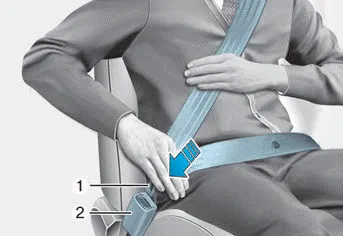
Pull the seat belt out of the retractor and insert the metal tab (1) into the buckle (2). There will be an audible ŌĆ£clickŌĆØ when the tab locks into the buckle.

You should place the lap belt (1) portion across your hips and the shoulder belt (2) portion across your chest.
The seat belt automatically adjusts to the proper length after the lap belt portion is adjusted manually so that it fits snugly around your hips. If you lean forward in a slow, easy motion, the belt will extend and move with you.
If there is a sudden stop or impact, the belt will lock into position. It will also lock if you try to lean forward too quickly.
NOTICE
If you are not able to smoothly pull enough of the seat belt out from the retractor, firmly pull the seat belt out and release it. After release, you will be able to pull the belt out smoothly.
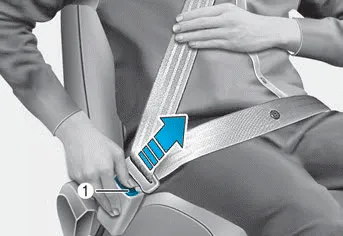
To release your seat belt:
Press the release button (1) in the locking buckle.
When it is released, the belt should automatically draw back into the retractor. If this does not happen, check the belt to be sure it is not twisted, then try again.
WARNING Improperly positioned seat belts may increase the risk of serious injury in an accident. Take the following precautions when adjusting the seat belt: Position the lap portion of the seat belt as low as possible across your hips, not on your waist, so that it fits snugly.
This type of seat belt combines the features of both an emergency locking retractor seat belt and an automatic locking retractor seat belt. Convertible retractor type seat belts are installed in the rear seat positions to help accommodate the installation of child restraint systems.
Other information:
Hyundai Venue (QX) (2020-2026) Service Manual: Mode Control Actuator. Repair procedures
Inspection 1. Turn the ignition switch OFF. 2. Disconnect the mode control actuator connector. 3. Verify that the mode control actuator operates to the defrost mode when connecting 12V to terminal 3 and grounding terminal 4.
Hyundai Venue (QX) (2020-2026) Service Manual: Heater & A/C Control Unit (Manual). Components and components location
Categories
- Manuals Home
- Hyundai Venue Owners Manual
- Hyundai Venue Service Manual
- Rear Seat Assembly. Repair procedures
- Operating Door Locks from Outside the Vehicle
- Trip Computer
- New on site
- Most important about car
