Hyundai Venue: Driveshaft Assembly / Front Driveshaft. Repair procedures
Hyundai Venue (QX) (2020-2025) Service Manual / Driveshaft and axle / Driveshaft Assembly / Front Driveshaft. Repair procedures
| Removal |
| 1. |
Loosen the wheel nuts slightly.
Raise the vehicle, and make sure it is securely supported.
|
| 2. |
Remove the front wheel and tire (A) from front hub.
|

| 3. |
Loosen the driveshaft caulking nut (A).
|

| 4. |
Loosen the lower arm nut (A) and then remove the lower arm ball joint
by using SST(09568-1S100).
|
| 5. |
Remove the driveshaft (A) from the front axle assembly (B).
|
| 6. |
Insert a pry bar (B) between the transaxle case and joint case, and
remove the drive side driveshaft (A) from the transaxle case.
|
| 7. |
Insert a pry bar (B) between the transaxle case and joint case, and
remove the passenger side driveside driveshaft (A) from the transaxle
case.
|

| Inspection |
| 1. |
Check the driveshaft boots for damage and deterioration.
|
| 2. |
Check the driveshaft spline for wear or damage.
|
| 3. |
Check that there is no water or foreign material in the joint.
|
| 4. |
Check the spider assembly for roller rotation, wear or corrosion.
|
| 5. |
Check the groove inside the joint case for wear or corrosion.
|
| 6. |
Check the dynamic damper for damage or cracks.
|
| Installation |
| 1. |
Install in the reverse order of removal.
|
| 2. |
Check the alignment.
(Refer to Suspension System - "Alingment")
|

 Dynamic Damper. Components and components location
Components
1. BJ assembly
2. BJ circlip
3. BJ boot band
4. BJ boot
5. Dynamic damper
6. Shaft
7. TJ boot band
8...
Other information:
Hyundai Venue (QX) (2020-2025) Service Manual: Components and components location
..
Hyundai Venue (QX) (2020-2025) Owners Manual: Shift-lock system, Shift-lock release, Parking
Shift-lock system For your safety, the Intelligent Variable Transmission (IVT) has a shift-lock system which prevents shifting the transmission from P (Park) into R (Reverse) unless the brake pedal is depressed. To shift the transmission from P (Park) into R (Reverse): 1...
Categories
- Manuals Home
- 1st Generation Venue Owners Manual
- 1st Generation Venue Service Manual
- Tire Pressure Monitoring System (TPMS) (Type A)
- Type B, C
- Smart Key
- New on site
- Most important about car
Smart Key
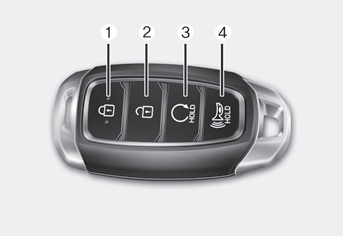
Your HYUNDAI uses a Smart Key, which you can use to lock or unlock the driver and passenger doors or the rear liftgate.
1. Door Lock
2. Door Unlock
3. Remote start

Copyright © 2025 www.hvenueqx.com