Hyundai Venue: Power Door Mirrors / Power Door Mirror Assembly. Repair procedures
Hyundai Venue (QX) (2020-2025) Service Manual / Body Electrical System / Power Door Mirrors / Power Door Mirror Assembly. Repair procedures
| Inspection |
| 1. |
Disconnect the negative (-) battery terminal.
|
| 2. |
Remove the door trim.
(Refer to Body - "Front Door Trim")
|
| 3. |
Disconnect the power door mirror connector (A) from the harness.
|
| 4. |
Apply battery voltage to each terminal as shown in the table and verify
that the mirror operates properly.
Actuator
Folding Mirroe
Side repeater lamp/Mirror heater
Warning indicator
|

| Removal |
| 1. |
Disconnect (-) battery terminal.
|
| 2. |
Using a fastener remover (C), remove the mirror (A) as illustration
below.
|


| 3. |
Disconnect the mirror connector (A).
|
| 4. |
Remove the scalp.
|


| 5. |
Remove the front housing cover (A).
|
| 6. |
Disconnect the LED side repeater lamp connector (A) and then remove
the LED side repeater lamp (B).
|

| Installation |
| 1. |
Install the puddle lamp and LED side repeater lamp.
|
| 2. |
Install the front housing cover.
|
| 3. |
Install the scalp.
|

| 4. |
Install the door mirror assembly.
|
| 5. |
Connect (-) battery terminal then check if door mirror lamp works normally.
|


Other information:
Hyundai Venue (QX) (2020-2025) Service Manual: Components and components location
..
Hyundai Venue (QX) (2020-2025) Service Manual: Repair procedures
Replacement • Put on gloves to prevent hand injuries. • When removing with a flat-tip screwdriver or remover, wrap protective tape around the tools to prevent damage to components...
Categories
- Manuals Home
- 1st Generation Venue Owners Manual
- 1st Generation Venue Service Manual
- Rear Combination Light Bulb Replacement
- Remote start
- Smart Key
- New on site
- Most important about car
Interior Overview
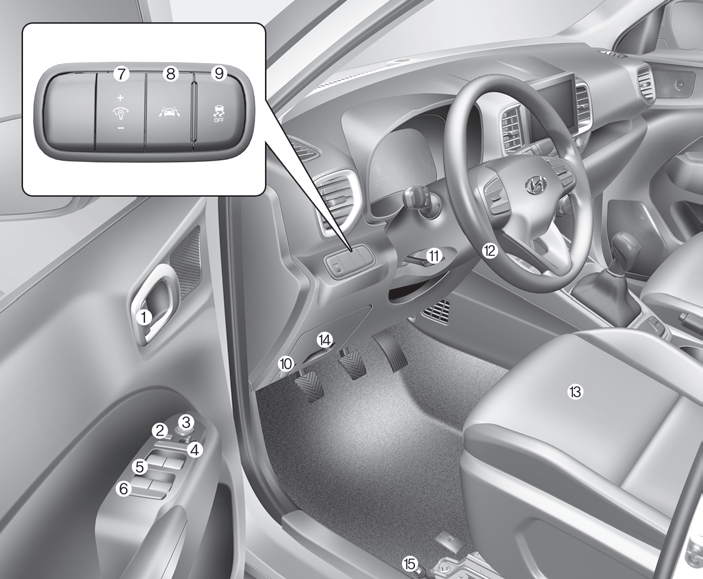
1. Door lock/unlock button
2. Outside rearview mirror control switch
3. Central door lock switch
4. Power window switches
5. Power window lock switch

Copyright © 2025 www.hvenueqx.com