Hyundai Venue: Floor Carpet / Repair procedures
Hyundai Venue (QX) (2020-2025) Service Manual / Body (Interior and Exterior) / Floor Carpet / Repair procedures
| Replacement |
|

| 1. |
Remove the floor console assembly.
(Refer to Floor Console - "Floor Console Assembly")
|
| 2. |
Remove the front seat assembly.
(Refer to Front Seat - "Front Seat Assembly")
|
| 3. |
Remove the rear seat cushion assembly.
(Refer to Rear Seat - "Rear Seat Assembly")
|
| 4. |
Remove the cowl side trim.
(Refer to Interior Trim - "Cowl Side Trim")
|
| 5. |
Remove the center pillar lower trim.
(Refer to Interior Trim - "Center Pillar Trim")
|
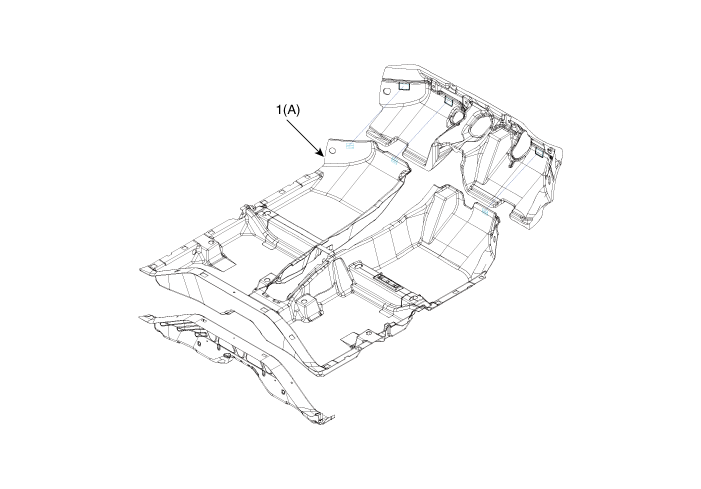
| 6. |
Remove the floor carpet assembly (A).
|
| 7. |
To install, reverse removal procedure.
|

 Floor Carpet
..
 Front Bumper
..
Other information:
Hyundai Venue (QX) (2020-2025) Service Manual: Sunroof Assembly. Components and components location
..
Hyundai Venue (QX) (2020-2025) Service Manual: Oil Level Gauge & Pipe. Repair procedures
Removal and Installation 1. Remove the oil level gauge & rod (A). Tightening torque : 9.8 - 11.8 N.m (1.0 - 1.2 kgf.m, 7.2 - 8.7 lb-ft) 2. Install in the reverse order of removal...
Categories
- Manuals Home
- 1st Generation Venue Owners Manual
- 1st Generation Venue Service Manual
- Warning and Indicator Lights
- Type B, C
- Shift-lock system, Shift-lock release, Parking
- New on site
- Most important about car
Vehicle Identification Number (vin), Vehicle Certification Label
Vehicle Identification Number (vin)
Frame number

Copyright © 2025 www.hvenueqx.com