Hyundai Venue: Maintenance / Air Cleaner
Filter Replacement
The air cleaner filter can be cleaned for inspection using compressed air.
Do not attempt to wash or to rinse it, as water will damage the filter.
If soiled, the air cleaner filter must be replaced.
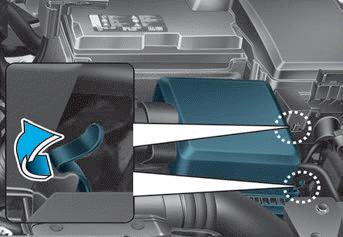
1. Loosen the air cleaner cover attaching clips and open the cover.
2. Wipe the inside of the air cleaner.
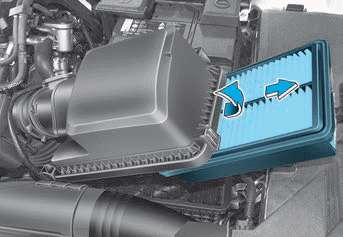
3. Replace the air cleaner filter.
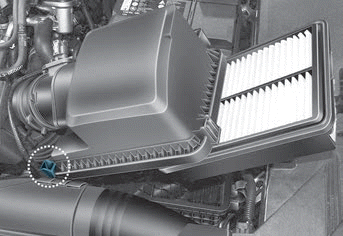
4. Lock the cover with the cover attaching clips.
5. Check that the cover is firmly installed.
Information
If the vehicle is operated in extremely dusty or sandy areas, replace the element more often than the usual recommended intervals (refer to “Maintenance Under Severe Usage Conditions” in this chapter).
NOTICE
- Do not drive with the air cleaner filter removed. This will result in excessive engine wear.
- When removing the air cleaner filter, be careful that dust or dirt does not enter the air intake, or damage may result.
- Use HYUNDAI genuine parts. Use of non-genuine parts could damage the air flow sensor.
 Parking Brake
Checking the Parking Brake
Check the stroke of the parking brake by counting the number of “clicks” heard
while fully applying it from the released position...
 Climate Control Air Filter
Filter Inspection
The climate control air filter should be replaced according to the Maintenance
Schedule. If the vehicle is operated in severely air-polluted cities or on dusty
rough roads for a long period, it should be inspected more frequently and replaced
earlier...
Other information:
Hyundai Venue (QX) (2020-2025) Service Manual: Clutch Switch. Repair procedures
Removal 1. Turn ignition switch OFF and disconnect the negative (-) battery cable. 2. Remove the crash pad lower panel. (Refer to Body - "Crash Pad") 3...
Hyundai Venue (QX) (2020-2025) Service Manual: Tail Gate Assembly. Repair procedures
Replacement 1. Remove the TailGate trim. (Refer to tailgate - "Tailgate Trim") 2. Using a flat-tip screwdriver, lift up slightly the socketclips (A) of both ends on the lifter (B), and thenremove the lifter from the bracket...
Categories
- Manuals Home
- 1st Generation Venue Owners Manual
- 1st Generation Venue Service Manual
- Shift-lock system, Shift-lock release, Parking
- Type B, C
- Remote Key
- New on site
- Most important about car
Fuel gauge

This gauge indicates the approximate amount of fuel remaining in the fuel tank.
Information
The fuel tank capacity is given in chapter 2. The fuel gauge is supplemented by a low fuel warning light, which will illuminate when the fuel tank is nearly empty. On inclines or curves, the fuel gauge pointer may fluctuate or the low fuel warning light may come on earlier than usual due to the movement of fuel in the tank.